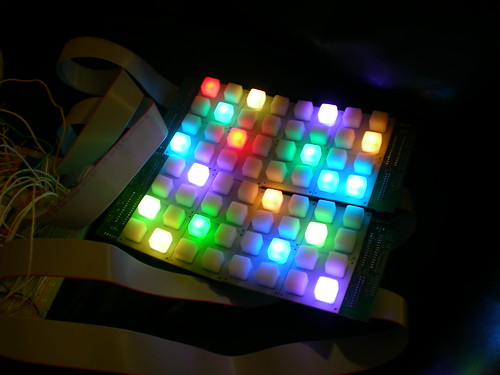
The OcTinct, the 8x8 member of the Tinct family (a full-colour monome clone), is up and running! The colours don't show up nearly as well in my videos (if anyone knows how to fix that, please let me know):
Technical details after the jump.
The Tinct is based off of custom-made PCBs and is being driven by an Arduino. The colour of each LED can be independently set, and the colour range is pretty much as close to "true" colour as you're going to get with an LED. The software is fully monome-compatible; the OSC command set is a superset of the monome protocol, adding in commands to control colour. Right now the colour control is pretty rudimentary, but will be expanded. There are two auxiliary analog inputs, which can be attached to anything that gives output as voltage: for example, potentiometers (as seen in the Life video above), or a two-axis accelerometer.
The controlling circuitry is currently all on breadboards, and is a horrible mess. You can see it in the videos. Eventually I'm going to make boards to hold this all nicely, and maybe tuck it into a nice case. Before I do that, I'm probably going to try a redesigned control scheme which uses two microcontrollers instead of one, in order to have a dedicated "video card." If it improves performance enough, I'll keep it that way. This is all about teaching myself electronics, though, so mostly I want to see if I can get the dual-processor scheme working.
Right now it's being powered off of the USB connection, but this is a temporary solution. I'm limiting the current to each 4x4 board via the transistors (I did this accidentally, but it worked out nicely for testing). What this means is that if any colour channel is trying to draw too much current (which occurs when more than 5 LEDs on a single panel are on at full blast in any of the three colour channels), then the colours might go a bit funny or dim. This will be fixed when I get around to building a proper power supply.
I have two extra sets of the custom boards for building this. If you're interested in trying to build one, get in touch (jmg *shift-2* upwardnotnorthward *dot* com).
3 comments:
Awesome work! I've really enjoyed following your progress on this project and look forward to the finished product (and the schematics/code/etc).
Do you make electronic music? It'd be so cool to be able to play instruments you've built yourself.
You may need to increase your camera shutter speed (which will make the surrounding scene darker) to prevent the LEDs from overexposing the CCD. Have a look in your camera manual to see if you can do this.
Thanks, nullobject! The schematics and code will get posted one day, but the schematics still haven't been fully put together, and the code is changing on a day-to-day (and often minute-to-minute) basis, so I'm holding off on posting until I'm done. Or at least, done "enough" for it to be presentable.
I don't really make any type of music, unfortunately. I wish I did, but my talents lie more in the technical and less on the aesthetic side of things.
I'll check my camera manual like you suggested, and hopefully I'll be able to find something helpful. Thanks!
Yep, you want to underexpose the image (according to the camera's automatic metering) but the best way to do this is to close the camera's aperture. When you change a consumer camera's exposure setting that's usually what it does first. If you change the shutter speed then you might get flickering while filming pulse width modulated LEDs.
Nice project! I've ordered some TLC5940s from TI and am going to give them a try as soon as they come!
-Andrew
Post a Comment